For each domain whose e-mail is hosted with us, the Apanel console offers two lists of rules: the Blacklist, for senders whose messages you no longer want to receive, and the Whitelist, for senders you always want to receive. They come on top of the automatic antispam filter: use them when an unwanted sender keeps coming back, or when a legitimate correspondent has their messages refused or filed as spam by mistake.
Requirements
- The e-mail service must be enabled for the domain, on our e-mail platform: the E-mail card then appears in Hosting management, with the Blacklist / whitelist tile. If the tile is missing, your e-mail is not hosted with us: rules are managed by the provider that runs it.
Before you start
- A rule pairs a Sender with a Recipient. The sender is the one whose messages you filter; the recipient is one of your mailboxes, or all the mailboxes of the domain.
- The Blacklist refuses, the Whitelist accepts. Messages that match a rule in the Blacklist are refused; messages that match a rule in the Whitelist are accepted. A rule entered in the wrong list is deleted, then created again in the other one.
- A rule cannot be edited: to correct it, delete it and create it again.
- A sender's address can be forged: anyone can write a message pretending to be another address (see Why do you receive spam error messages spoofing your email address?). Prefer a precise rule to one that covers a whole domain or a whole extension, especially in the Whitelist.
- The domain and its aliases share the same lists: rules created for the domain's e-mail aliases also show in the list.
Which tool for which problem
Open the Blacklist / whitelist page
- Log in to your Apanel console.
- From the dashboard, click your domain name to open Hosting management.
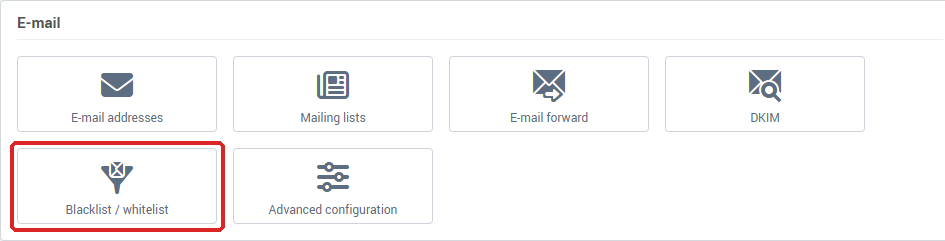
- In the E-mail card, click Blacklist / whitelist.
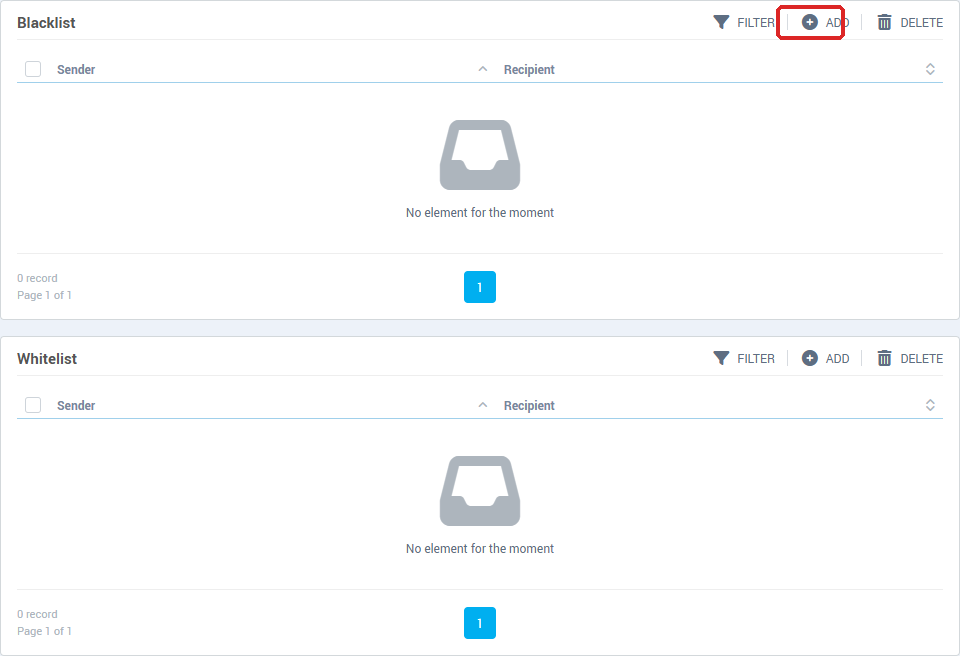
The page shows two blocks, Blacklist and Whitelist. Each one lists its rules in two columns, Sender and Recipient, and has its own Filter, Add and Delete buttons. The Filter button opens search fields so you can find a rule in a long list; the list shows 30 rules per page.
Add a rule
- In the block you want (Blacklist or Whitelist), click Add.
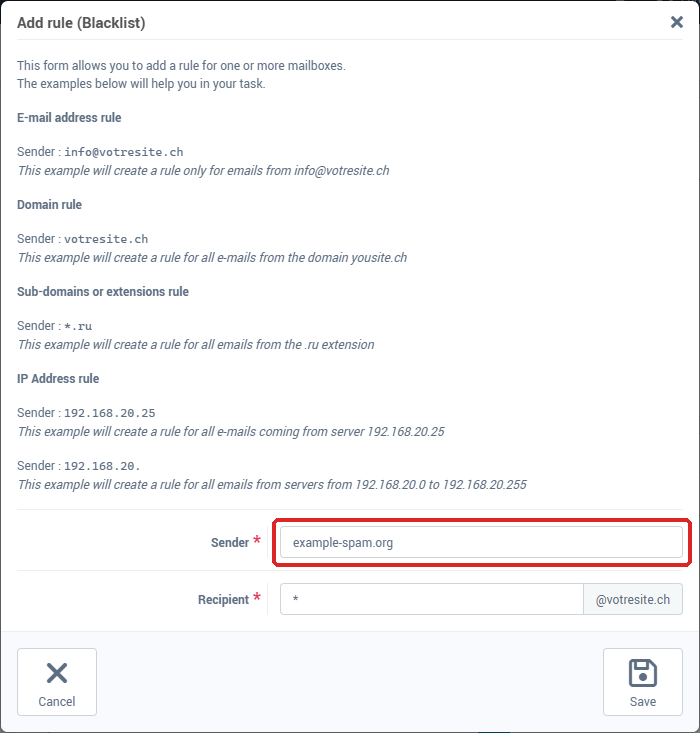
- In the Add rule (Blacklist) or Add rule (Whitelist) window, enter the Sender: the address, domain or IP address to filter. The examples below are also shown at the top of the window.
- In Recipient, leave
* to apply the rule to all the mailboxes of the domain, or enter the name of a single mailbox (the part before the @). While you type, the console suggests the names of your existing mailboxes. If the domain has e-mail aliases, the list after the @ lets you choose the domain concerned.
- Click Save.
The window closes and the rule appears in the list, with the message Operation succeded.
What to enter in Sender
| What you enter |
What the rule covers |
info@yoursite.ch |
only the messages that come from this address |
yoursite.ch |
all the messages that come from this domain |
*.ru |
all the messages that come from this extension |
192.168.20.25 |
all the messages that come from this server |
192.168.20. |
all the messages that come from the servers from 192.168.20.0 to 192.168.20.255 |
The field only accepts lowercase letters without accents, digits and the signs _ - * @ . =: no spaces, no capital letters.
Delete a rule
- Tick the box in front of each rule to delete.
- Click Delete in the block concerned.
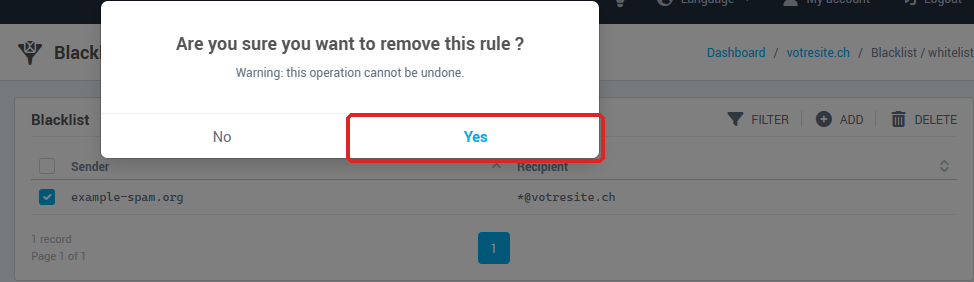
- The window asks Are you sure you want to remove this rule ? (or these rules if you ticked several) and reminds you that the operation cannot be undone. Click Yes.
Going further: flag messages that come from outside
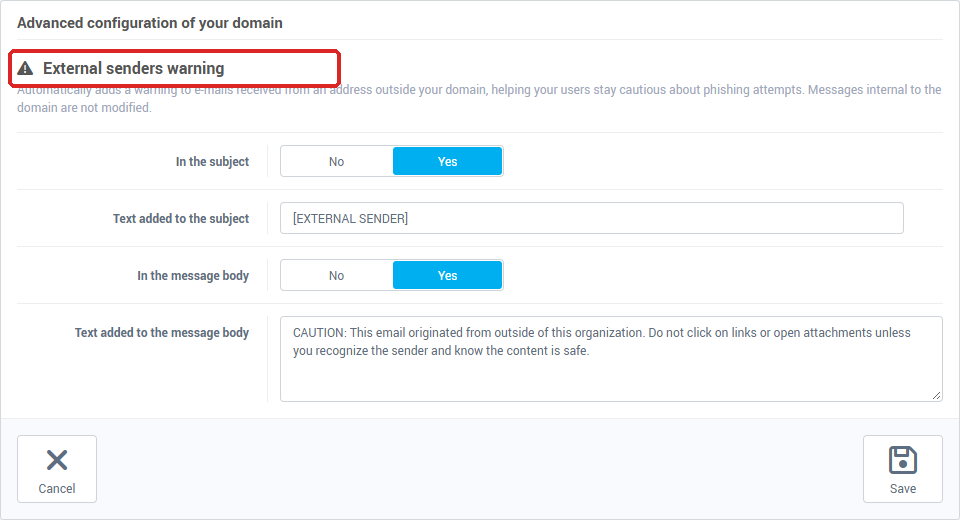
On the same E-mail card, the Advanced configuration tile offers a related setting: the External senders warning. It automatically adds a warning to messages received from an address outside your domain, to help your users stay cautious about phishing attempts. Messages internal to the domain are not modified. It is not a filter: the messages still arrive, but they are flagged.
- In the E-mail card, click Advanced configuration.
- In the External senders warning block, set In the subject to yes to add text to the subject of messages. The Text added to the subject field appears; it is pre-filled with
[EXTERNAL SENDER] as long as nothing has been saved.
- Set In the message body to yes to add text inside the message itself. The Text added to the message body field appears; it is pre-filled with a warning in English that you can replace with your own.
- Click Save.
This page only exists for domains hosted on our e-mail platform. Otherwise, the console shows Advanced configuration is only available for domains hosted on SmarterMail.
Troubleshooting
- "Incorrect value" under Sender or Recipient: the field contains a character that is not allowed. Use only lowercase letters without accents, digits and
_ - * @ . =. For Recipient, the part before the @ only accepts lowercase letters without accents, digits and _ - * ..
- "This field is required": the Sender is mandatory.
- "This rule already exists": the same Sender and Recipient pairing is already in one of the two lists. Look for it with Filter.
- "You have to select one item in the datatable before pressing this button": tick at least one rule before clicking Delete.
- "An error occurred during the operation" followed by an Error code: note this code and send it to our support with the domain name.
- A listed sender keeps arriving, or a legitimate correspondent is still refused: check that the rule is in the right list, that the Sender is written the way it appears in the address or server the messages come from, and that the Recipient is the mailbox concerned. If the problem persists, contact our support with a sample message and its full headers (see What is an email header?).
- The Blacklist / whitelist tile does not appear: the E-mail card only shows when the e-mail service is enabled for this domain, and the rule tiles only concern e-mail hosted with us.